Introduction
This technical guidance document provides detailed instructions for joining a flat flex single loop edge (SLE) conveyor belt using the full strand joining method. This method is crucial for ensuring the longevity and efficiency of your conveyor belt system. Please follow these steps carefully and use the appropriate tools as recommended. This document provides a step-by-step guide to properly join a flat flex conveyor belt using the full strand joining method, ensuring the belt functions optimally in your system.
Tools Required
- Safety glasses
- Flat end pliers
- Needle nose pliers
- Cable ties, soft wire, or string (optional)
- Cutting pliers
- Wire straightener (optional)
- Necessary tools for conveyor belt take-up adjuster
Detailed Steps
Step 1: Preparation Before Joining
1. Slacken the Belt Take-Up Adjuster:
Ensure the maximum take-up capability by loosening any belt take-up adjusters before fitting the belt.
2. Position the Belt:
If possible, move the belt ends to be joined to the discharge end of the conveyor. This helps in holding the belt in position during joining.
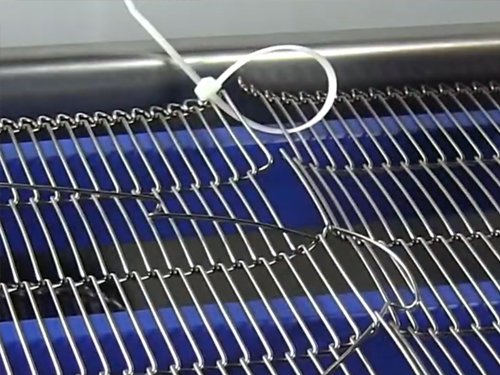
3. Check the Edge Loops Orientation:
Verify that the edge loops curve away from the direction of belt travel. If they don’t, the belt might be threaded backward.
4. Prepare the Joining Strand:
Remove a strand from one end of the belt or from a spare belt roll. Lay this strand between the two belt edges, ensuring the edge loops align with the belt’s edge loops and are “right side up.”
5. Stabilize the Belt Ends:
To maintain stability, you may use cable ties, soft wire, or string to attach the two belt ends together in the outside spaces.
Step 2: Begin Joining at the Centre
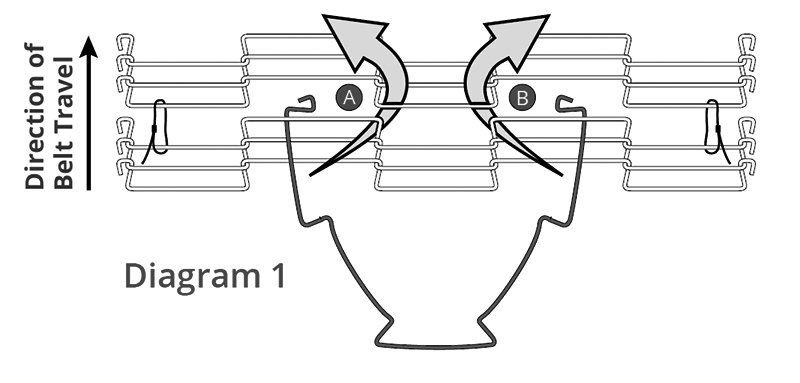
1. Insert the Strand:
Flex the strand from each side and insert the ends into the spaces next to the center space (Spaces A and B in Diagram 1).
2. Lock the Strand in Place:
Pull the strand ends through the center space of the opposite near side edge until it locks into place (Spaces C in Diagram 2).

3. Straighten the Wire:
Use pliers or a wire straightener to straighten the wire in the center space.
Step 3: Weave the Strand to One Side
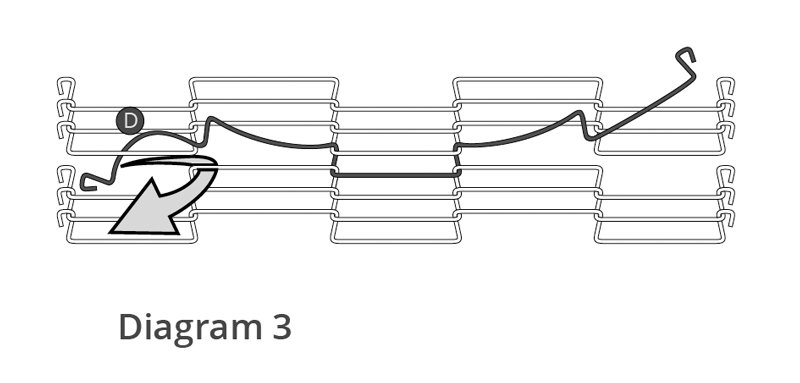
1. Weave Through the Z-Bends:
Flex or bend the wire in the next space and insert it through the Z-bend in the space on the belt end closest to you (Space D in Diagram 3). Be cautious to avoid bending the wire at the Z-bend.
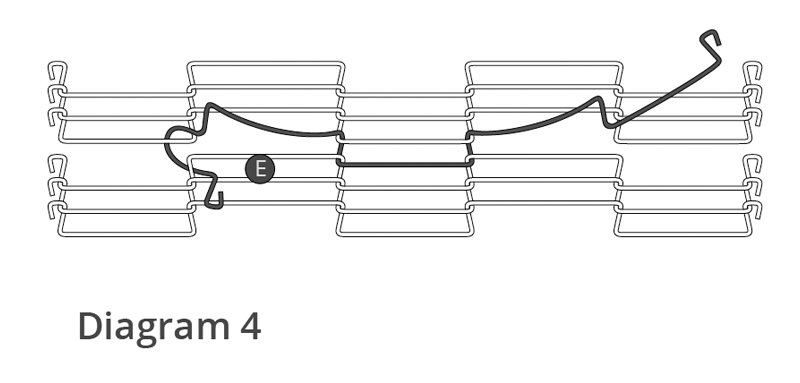
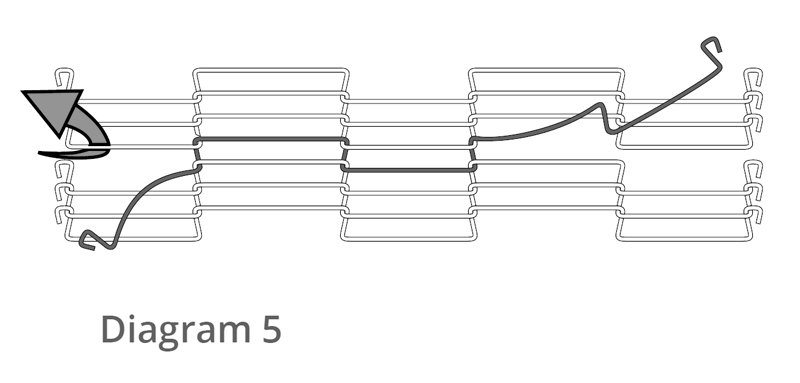
2. Continue Weaving:
Bend the wire toward the center and insert it up through and around the Z-bend next to the center space (Space E in Diagram 4). Repeat these steps until you reach the side edge of the belt (Diagram 5).
3. Connect the Edge Loops:
Use pliers to connect the join strand’s edge loop to the belt’s edge loop on the near edge (Diagram 6). On the far edge, flex the outer space strand up through the connected join strand.

Step 4: Weave Strand to the Opposite Side
Repeat the weaving process (Step 3) in the opposite direction, moving towards the other side of the belt.
Step 5: Check Drive Shaft Sprocket Alignment
1. Ensure Clearance:
There should be a 3-5mm clearance between all sprockets (or blanks) and the Z-bends next to them.
2. Check Alignment:
Use a straight edge to verify the alignment of sprocket teeth, especially if the sprockets are not keyed to the drive shaft.
3. Adjust Drive Shaft Setup:
Follow the ‘Standard Arrangement’ for the drive shaft setup.
Step 6: Ensure Z-Bend Clearance
1. Avoid Contact:
Z-bends should not touch any conveyor components, such as end rolls, wear strips, transfer support rails, or nose bars. Adjust as needed.
Step 7: Adjust Belt Tension
1. Apply Minimal Tension:
The flat flex conveyor belt is a low-tension belt. Only apply enough tension to allow the drive sprockets to properly engage the belt.
2. Test the Conveyor:
Run the conveyor to ensure it operates smoothly. Excessive tension can cause premature belt failure.
Important Notes
- Avoid Deforming Z-Form Links:
To prevent permanent deformation of the Z-form links during joining, it might be necessary to bend the adjacent wire space slightly, but ensure the wire is straightened before continuing.
- Avoid Vertical Bends:
All necessary bending of the wire strand should be done in the horizontal plane.
- Secure Wide Belts:
For wider belts, it might be necessary to secure the belt ends at regular intervals across the belt. These can be removed as the strand is woven towards the outer edge.